概要
昨日(2018/11/17)、「初心者向けXamarinハンズオン」に参加したのですが、そこMicrosoft社の「Azure Face API」(顔検出・認識・分析API)を試してきたので、メモ。
イベントページ:https://jxug.connpass.com/event/96679/
※すでに終了してます。
使用方法
公式サイトから、下記いずれかのアカウントを取得する。
- Azureアカウント(30000トランザクション/月まで無料)
- 7日間試用版アカウント
※この記事の内容は、「7日間試用版」で実施。
公式サイト:https://azure.microsoft.com/ja-jp/services/cognitive-services/face/
コーディング
公式サイトの左側ツリーの「クイックスタート」内に記載されている、
上記サンプルコードのうち、該当する方を参考にコーディングする。
※本記事は「クライアントSDK使用」にて実施。
サンプルソース
下記を参照。
※下記ソースは、「初心者向けXamarinハンズオン」の下記「本家リポジトリ」の
- HandsOnLab/Start/DevDaysSpeakers/DevDaysSpeakers.Shared/View/DetailsPage.xaml.cs
の内容を、「手順書」の内容を基に編集したものです。
本家リポジトリ:https://github.com/jxug/dev-days-labs-ja/tree/master/hands-on
手順書:https://github.com/jxug/dev-days-labs-ja/tree/master/hands-on
※コメントが記載してない箇所は、「Xamarinハンズオン」に関係しますが「Face API」には直接関係ない処理です。
using System;
using DevDaysSpeakers.Model;
using Xamarin.Essentials;
using Xamarin.Forms;

// Face API関連のインポート
using Microsoft.Azure.CognitiveServices.Vision.Face;
using Microsoft.Azure.CognitiveServices.Vision.Face.Models;

using System.Threading.Tasks;
using System.Collections.Generic;

namespace DevDaysSpeakers.View
{
    public partial class DetailsPage : ContentPage
    {
        // エントリポイント
        private const string faceEndpoint =
            "https://westcentralus.api.cognitive.microsoft.com";

        // 取得したキー(キー1またはキー2)
        private const string subscriptionKey = "(Input Your Key)";

        // 取得したい(顔の)情報を配列で設定。
        private static readonly FaceAttributeType[] faceAttributes =
            { FaceAttributeType.Age, FaceAttributeType.Gender, FaceAttributeType.Emotion };

        readonly Speaker speaker;

        public DetailsPage(Speaker speaker)
        {
            InitializeComponent();

            SetActivityIndicatorProperty(false);

            this.speaker = speaker;
            BindingContext = this.speaker;

            ButtonSpeak.Clicked += ButtonSpeak_Clicked;
            ButtonWebsite.Clicked += ButtonWebsite_Clicked;
            ButtonDetectFace.Clicked += ButtonDetectFace_Clicked;
        }

        private async void ButtonSpeak_Clicked(object sender, EventArgs e)
        {
            await TextToSpeech.SpeakAsync(this.speaker.Description);
        }

        private void ButtonWebsite_Clicked(object sender, EventArgs e)
        {
            if (speaker.Website.StartsWith("http"))
                Device.OpenUri(new Uri(speaker.Website));
        }

        // 「顔を検出」ボタンクリック処理
        private async void ButtonDetectFace_Clicked(object sender, EventArgs e)
        {
            // FaceClientクラスの設定
            var faceClient = new FaceClient(
                new ApiKeyServiceClientCredentials(subscriptionKey),
                new System.Net.Http.DelegatingHandler[] { });
            faceClient.Endpoint = faceEndpoint;

            // インターネット上の顔画像ファイルのパス。(speaker.Avaterにパス情報が格納されています。)
            var remoteImageUrl = speaker.Avatar;

            // ローカル上の顔画像ファイルのパス
            // var localImagePath = @"<LocalImage>";

            try
            {
                SetActivityIndicatorProperty(true);

                // リモートの顔画像から情報を取得。
                // (ローカルの場合は「DetectWithStreamAsync()」メソッドを使用。)
                IList<DetectedFace> faceList = await faceClient.Face.DetectWithUrlAsync(
                    remoteImageUrl, true, false, faceAttributes);

                // 取得できなかった場合
                if (faceList.Count == 0 || faceList == null)
                    return;

                SetActivityIndicatorProperty(false);

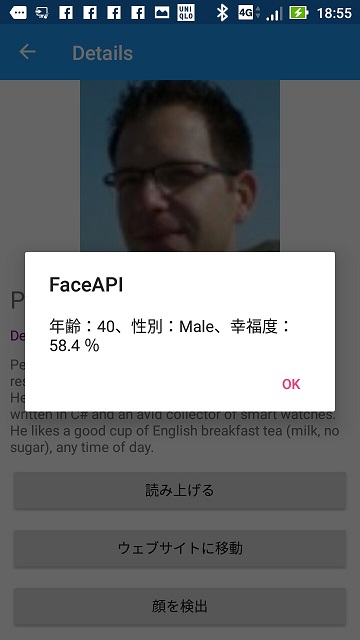
                // 取得できた場合、そこから情報(年齢・性別・感情(幸福度))を取得し、メッセージボックスを表示。
                var age = faceList[0].FaceAttributes.Age;
                var gender = faceList[0].FaceAttributes.Gender;
                var emotion = (faceList[0].FaceAttributes.Emotion.Happiness * 100.000).ToString();

                var message = string.Format("年齢:{0}、性別:{1}、幸福度:{2} %", age, gender, emotion);
                await DisplayAlert("FaceAPI", message, "OK");
            }
            catch (APIErrorException exApi)
            {
                throw new Exception(exApi.Message.ToString());
            }
            catch (Exception ex)
            {
                await DisplayAlert("FaceAPI Exception", ex.ToString(), "OK");
            }
            finally
            {
                SetActivityIndicatorProperty(false);
            }
        }

        private void SetActivityIndicatorProperty(bool value)
        {
            AILoading.IsRunning = value;
            AILoading.IsVisible = value;
        }
    }
}
ポイントとしては、
※下記のインポート(using)
※取得したい(顔の)情報(FaceAttributeType)をFaceAttributeType配列で設定。
FaceAtteributeについては、下記ページが参考になります。
参考ページ:Microsofrt AzureのFace APIを使って笑顔をAIに判断してもらおう
※エントリポイント、キーの設定
※リモート/ローカル画像に応じたメソッド実施(DetectWithUrlAsync/DetectWithStreamAsync)
でしょうか。
ハマった点
Azureアカウントの場合、EntryPointのURLは公式ソースと違い「国・地域」を反映させたものじゃないとダメ。 (7日間試用版の場合、公式ソース同様「westcentralus」で問題ないです。)
発行されるEntryPointのURLの末尾に「Face/(バージョン)」と書かれているが、実際には「Face/(バージョン)」は不要。(ドメイン名まででよい。てか、公式ソースがそうなってるし...ちゃんと読めよ...)
実行結果

てか、Face API(Cognitive Service)に限らず、Azureとか、どんどん触れていきたいと思いました。